When did festive, ‘ugly’, Christmas sweaters become a tradition in the otherwise innocent and cheery holiday that is Christmas? I didn’t attend my first Ugly Christmas Sweater party until I was 25 years old, but apparently, I’ve missed out on several years of weird and unusual Christmas sweater-wearing each passing holiday season prior. Despite never attending one prior to my 25th year of life, I took the DIY Christmas sweater agenda on for both myself and my husband (boyfriend at the time) pretty intensely when we were invited to our first. I think I made our matching sweaters in one day, working hard into the night, stressing over every detail. Our sweaters came out more cute than ugly, but the glued on string of lights made it all worth while, and every detail of each character was something I felt especially proud of.
Insert photo from Christmas past here:

This year, I have a 2 year old niece, who is all about those sweaters and their lights “all a-glow”. I was particularly interested to see if I could recreate Kalen and I’s sweaters in a more condensed way to fit a tiny 2 year old, and I was surprised to learn that, while I was more limited in spacial area, I made an okay looking sweater that resembled my own in about an hours time. Call me a one-trick-pony, but I settled on the same format; why fix something that isn’t broken? Kalen and I won best couple’s sweaters with those guys two years ago… that has got to count for something.
Here’s what you’ll need:

- Sweater in appropriate size - I found this tinsel-embellished guy at Target- 2T
- Hot glue gun and extra glue sticks
- Garland of your choice, preferably one that can be made to resemble a Christmas tree
- Holiday sequins and decorations to act as ornaments on your tree
- Multiple felt-colored sheets to create your Christmas characters
- Small stocking
- Sparkly craft/scrapbook paper
- Battery pack string of lights
- Batteries
- Plastic bag
- Different sized felt balls
- Googly eyes - small
- Cotton balls
- Scissors
This is year three of making these sweaters, and Michael’s craft store once again this year had both the original garlands I made my and Kalen’s sweaters with - I picked the same one I used to make my husband’s to adorn Izzy’s Christmas sweater this year. I also bought these tiny stockings and the small battery-pack string of lights from the Dollar Store both years, so I definitely recommend starting there to find some of your supplies - they have lots of little decorative items, too, that you can choose from!
Here’s what you need to do:
- Heat up your hot glue gun.
- Place plastic bag inside sweater so that it lies between the front and back of your sweater. This will ensure that any hot glue you put on the front of the sweater that may run through, will not glue to the back of the sweater. I promise - that is something you do not want.
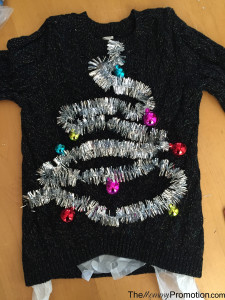
- Next, align your garland on your sweater in your preferred fashion to resemble a Christmas tree. Trim as necessary to fit your sweater (- save room for your stocking, presents and tree trunk at the bottom!) Take your time, and hot glue the garland to your sweater, following slowly along the length of the garland.

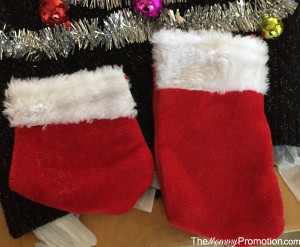
- If you are making a kid’s sized Christmas sweater, you will want to cut the stocking down to fit your sweater - but also keeping it large enough to house your battery pack later. These stockings came as a set of 2 at the Dollar Store. I cut the fuzzy part off first, and then cut down the stocking - adding the fur back once I got it to the size I needed. Glue to left bottom corner of sweater.
- Next, begin assembling your characters. For Izzy’s sweater, I could only manage to create the heads of her favorite iconic Christmas characters, whereas, Kalen and I’s sweaters could fit three rather large and full-bodied figures. Dig up your creative side, and make these however you choose! I opted for a Rudolph, Santa and a Snowman. Use your scissors, felt, googly eyes, felt balls, and lots glue to create your characters. You can opt for a gingerbread man, a nutcracker, an elf… this sweater is fair game for all the Christmas fairy tale creatures. Here’s how I pulled Santa together (the fur for his hat and beard is a torn apart cotton ball):
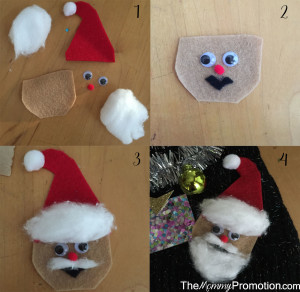
- Glue your characters in any of the leftover three corners of your sweater.
- Use a brown colored felt to cut a rectangle to act as your tree trunk; glue under garland.
- Cut out random squares and rectangles from your sparkly paper, and glue under your tree to resemble gifts. Cut small triangles to form bows.
- Carefully glue your string of lights (making sure to keep the extra wire at the end of the string loose to fit inside the stocking - there are no lights on the end, so you might as well stick it in the stocking with the battery pack). Be sure battery pack is securely in the stocking before laying out your lights to glue down to the garland.
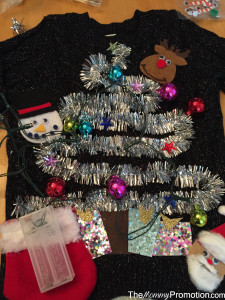
- Glue on decorations over the wires on the garland to act as extra ornaments - and to double as reinforcement and camouflage of your light string.
- Let dry and remove plastic bag from inside the sweater.
- Add batteries, put on your favorite guy or gal, and watch their eyes light up as their new, ugly Christmas sweater does!


Of course, always ensure that your battery pack is screwed in so that the batteries have no way of coming out. These can be very dangerous to kids, so if you feel unsure, tape around the pack to ensure it doesn’t come undone.
The sky is the limit on this sweater. Use your best creative judgment and just have fun. After all, even if it doesn’t come out perfect, it is supposed to be ‘ugly’… right?!
Happy Holidays!